After the end of a busy week, you deserve a good treat! Spending some spa time taking care of your face as you listen to your favorite music is an incredible way to mark the end of a tiresome week.
If your face feels dry or cracked, a good facial can help. This multi-step procedure will leave you feeling clean, radiant, and nourished. On top of it, you start to glow and look younger than before.
While you have the option of heading to the spa for this treatment, it’s just a little too much work. Furthermore, you spend extra bucks that you’d have saved if you had the facial procedure at home.
Best believe it’s more practical and much more relaxing to give yourself a spa-quality facial in the comfort of your home. You simply need to gather the right products in your pantry or the nearest store, and you’ll be good to go!
Well, if you want to try a face makeover at home, read through this article! We’ve provided the steps to do a facial at home with DIY products!
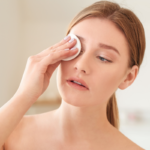
Step 1: Start With Cleansing

The first thing you need to do when getting a facial at home is to cleanse. Thoroughly Cleaning your face will remove makeup, oil, and dirt and set the pace for the other facial procedures you’ll do.
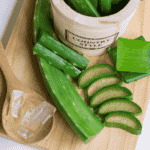
Products: For this step, you can use aloe vera gel – it’s such an excellent cleansing agent. Alternatively, honey also works perfectly in removing all impurities from your skin. Another great option to make a cleanser could be mixing tomato paste, fresh milk, lemon juice, and rice flour.
Method: Now, start by applying your DIY ingredient to your face and gently massage it with your palm. You might as well use a soft brush to deal with all the dirt. Then wash your face with clean lukewarm water, and Finally, Leave it out to air dry.
Read: How to Wash Your Face For Clear Skin
Step 2: Exfoliate

This step is crucial while doing a facial at home. It helps slog off the dead skin cells and opens up your clogged pores. In the end, you remain with radiant, smooth, and glowing skin – just how you love it!
Products: You can mix ground coffee, sugar, olive oil, and warm water to make a good scrub. You only need a pea size, so measure the ingredients wisely.
Method: Massage the DIY exfoliator on your skin and ensure you are gentle. Do it in a circular motion with your fingertips, paying the most attention to your T-zone. Essentially areas where you tend to be oilier – This has to be around your nose and chin. Ensure you remove all the blackheads and dirt from the skin during the process. Finally, rinse off your face with warm water.
Tip: Avoid scrubbing around the eye.
Read: 10 Amazing Ways to Exfoliate Your Skin Naturally
Step 3: Steam Your Face

The next step after scrubbing is steaming. This process helps open up your pores and makes the top layer of your skin softer. Further, your skin will be able to absorb the subsequent products better.
By steaming, you expose your skin to heat that relaxes and keeps it moist. If you have oily or acne-prone skin, this step will do wonders for your skin!
Products: You can use water alone for this step but can also add green tea or rosemary to it to derive extra skin benefits. Simply boil the water with the green tea leaves in a steamer or pot, and it will be ready for use.
Method: Cover your head with a towel to trap all the heat on your skin. Lean over towards the steamer and let your face soak in the steam. Remain in this position for 5 to 10 minutes, but you can take the towel off for a few seconds if you need air. Alternatively, you can soak a towel in hot water, then put it over your face.
Tip: Ensure that you do not over-steam your face since it will make it overly dry. Also, as you steam, maintain a considerable distance from the steamer to avoid the stinging sensation.
Step 4: It’s Time to Mask!

After exfoliating and then steaming, your pores are open – So go ahead to mask your face! Masking makes your skin feel nourished and moisturized, and it’s also a necessary step to get rid of any remaining impurities.
It allows you to enjoy some quiet time. At the same time, your skin will absorb all the good ingredients from the mask. You can also make a DIY mask home from natural ingredients, ensuring it perfectly fits your skin type!
Products: Grab some cocoa powder, honey, fresh mala, and oats from your pantry and mix them. If you have oily skin, you can mix oatmeal and avocado; for individuals with dry skin, banana and honey mix will do! As simple as that, you have your mask ready!
Method: Just apply the blend of your homemade mask all over your face. Place two cucumber slices on your eyes and leave the mask for 15 to 20 minutes. After this, wash it off with lukewarm water.
Read:
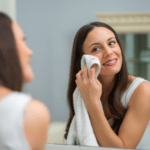
Step 5: Tone and Moisturize Your Face

Toning is a crucial step when doing a facial. Since your skin has absorbed all the good nutrients, a toning agent will help close and clean the pores. It maintains balance on the skin, brightens it, and eliminates the possibility of dirt settling on the skin.
Products: To make your toner at home, you can mix apple cider vinegar and water. Green tea water will also work perfectly in toning your skin.
Method: Use cotton wool and pour a few drops of your DIY toner on it. Gently massage it on the face in a circular motion. Allow the toner to settle on the skin and dry up.
Finally, after toning, you need to moisturize. The entire facial process might end up ripping off some moisture from your skin, so this step helps in hydrating your face. Further, it’s essential to retain and lock in the lost moisture.
Products: A quick moisturizer to use at home can be aloe vera or cucumber paste. You can as well mix the aloe vera gel with a few drops of olive oil to make a soothing and nourishing moisturizer.
Method: Apply the gel or paste to your face and gently massage it for a few minutes. Allow the skin to absorb the moisturizer.
Read: 7 Ways How to Moisturize Your Skin and Maintain It
Takeaway
This Marks the end of your spa-like facial procedure at home. Clearly, with the simplest ingredients at home, you bring your spa home and end up with glowing and healthy skin without spending a buck! Try this; you won’t regret it!